Till now , we have executed requests but have not written any testscripts. Meaning, there were no validation steps to verify whether the request passed or failed.
Now let us see who to do this. Let us write our first test script.!!!! 🙂
Automation tests with Postman:
There are two parts were we can write the scripts for our tests.
- Pre-request script
- Tests

Here pre-request script act as the test setup script, meaning, it will get executed before the tests. So if you have any pre-requisite like creating user variable or validating whether a user variable value exists, you can do it here.

Tests are were we write the actual tests, it get executed after we get the response.

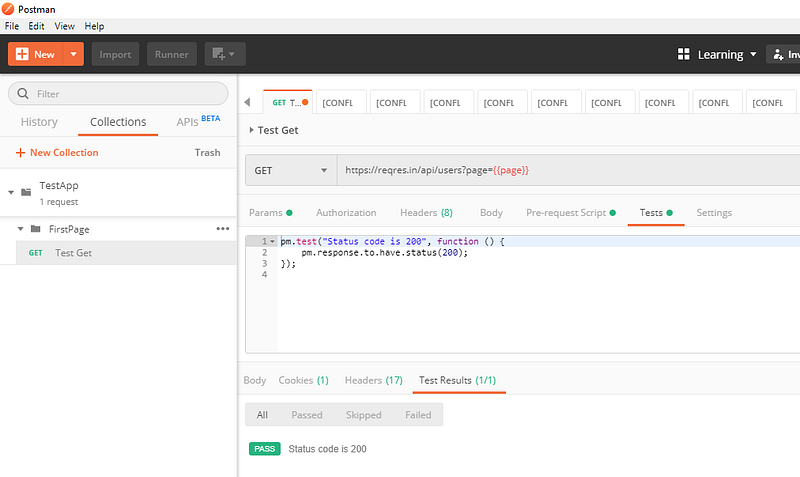
Writing first Test script:
The syntax of writing tests are as follows:
pm.test("Test_case_description", function () {
<Validation steps!> ( The steps are available as test snippet you just need to select it )
});

Note:
We can write tests at both the places ( Pre-request or Tests) but as tests are meant to be validating the user action, it should be written at the ‘Test’ tab so that it will be executed only after the action is completed.
Postman pm.test function expects different exceptions and passes or fails the test accordingly. You can try running just the below command without the ‘pm.test’ enclosed and observe that on sending the request an assertion is thrown.
(The below script is to validate whether the text ‘test’ as sub-string ‘b’ in it.)
pm.expect('test').to.have.string('b');

Now enclose the command in pm.test as below on both pre-request and Tests tab:
pm.test("Check string", function () {
pm.expect('test').to.have.string('b');
});
Now send the request and you will observe that two tests were executed.

Run the same using collection runner (Make sure to click save before running runner):

Chaining the response together:
Get the data from response body and store it in an environmental variable:
pm.test("Get email", function () {
var jsonData = pm.response.json();
var email= jsonData.data[2].email;
pm.environment.set("email", email);
});

Use this environmental variable in next test.
{
"email": "{{email}}",
"password": "cityslicka"
}
Till now , we have executed requests but have not written any testscripts. Meaning, there were no validation steps to verify whether the request passed or failed.
Now let us see who to do this. Let us write our first test script.!!!! 🙂
Automation tests with Postman:
There are two parts were we can write the scripts for our tests.
- Pre-request script
- Tests

Here pre-request script act as the test setup script, meaning, it will get executed before the tests. So if you have any pre-requisite like creating user variable or validating whether a user variable value exists, you can do it here.

Tests are were we write the actual tests, it get executed after we get the response.
Writing first Test script:
The syntax of writing tests are as follows:
pm.test("Test_case_description", function () {
<Validation steps!> ( The steps are available as test snippet you just need to select it )
});

Note:
We can write tests at both the places ( Pre-request or Tests) but as tests are meant to be validating the user action, it should be written at the ‘Test’ tab so that it will be executed only after the action is completed.
Postman pm.test function expects different exceptions and passes or fails the test accordingly. You can try running just the below command without the ‘pm.test’ enclosed and observe that on sending the request an assertion is thrown.
(The below script is to validate whether the text ‘test’ as sub-string ‘b’ in it.)
pm.expect('test').to.have.string('b');

Now enclose the command in pm.test as below on both pre-request and Tests tab:
pm.test("Check string", function () {
pm.expect('test').to.have.string('b');
});
Now send the request and you will observe that two tests were executed.

Run the same using collection runner (Make sure to click save before running runner):

Chaining the response together:
Get the data from response body and store it in an environmental variable:
pm.test("Get email", function () {
var jsonData = pm.response.json();
var email= jsonData.data[2].email;
pm.environment.set("email", email);
});

Use this environmental variable in next test.
{
"email": "{{email}}",
"password": "cityslicka"
}