in this approach, the libraries are initialized in the local scope, so if you want to use them again then you have to run the 3 lines of code again in other script sections whenever it’s used.
Second approach:
new Function triggers function in the global scope. so you just have to execute the first two lines only ones in your collection run and it will be available globally throughout:
pm.environment.set("res", res.text());
    // intialize the min.js
    new Function(pm.environment.get("res"))();
//create template soource
    var source =
        `{{#ifCond v1 v2}}
    {{v1}} is equal to {{v2}}
{{else}}
    {{v1}} is not equal to {{v2}}
{{/ifCond}}`;
//you can call methods in the cdn file using this keyword
    //here we are registring handlebar
Handlebars.registerHelper('ifCond', function (v1, v2, options) {
        if (v1 === v2) {
            return options.fn(this);
        }
        return options.inverse(this);
    });
//compile the template
    var template = Handlebars.compile(source);
//data to be passed
    // try v1 and v2 with same and different values and observe the output in visualization tab
    var data = {
        "v1": "test",
        "v2": "test",
    };
// passing the data to template
    var result = template(data);
//visualizing it
    pm.visualizer.set(result)
})
**Second Approach:**
you can call any package with min build in postman
this initializes the functions in local scope so it won’t mess up the global space and cause issues
its easier than you would expect to create a project collection…
Postman API Feature:
you can create collection , mock servers, documentation in click of a button by using postman API definition feature.
Lets see how to do it!!
Get the API definition:
postman supports following API definitions:
so what is API definitions ?
API definitions, or API specifications or description formats (all are the same) defines your API . It is like a live documentation on what is available, what it can do , what is supported etc . In short a comprehensive live documentation that can help consumers understand what your API can do.
in summary:
Help internal folks understand the API and agree on its attributes
Help external folks understand the API and what it can do
Act as live documentation on what all endpoints are available, what methods are supported, what attributes are expected etc.
you can see the link to the definition file, it can be in yaml or json format. just click the link and copy the content.
you can see the version is swagger 2.0 meaning its open api v2
2. Create API in Postman
click API section and click the add icon or create new API link
Now give the below details:
name,version , open api v2.0 and json , and click create
Now paste the swagger definition we copied from pet store:
you can press ctrl+b to format the json properly after pasting:
click save
3. Now Generate collection from this swagger definition:
click generate collection:
click show advanced settings:
Give the below settings:
Now click Generate collection and goto your collections once the collection generation completes
4. Mock server , documentation and other things
so the generated collection will have documentation and examples as per the API definition file provided so you don’t have to generate documentation separately!!
And for mockserver, you can directly create a mock server from the collection as the examples are already available.
5. Publishing your documentation and adding animation to your documentation
Click the collection and click view documentation , and click publish
Now you have the documentation available in public domain for your customers.
There is no inbuilt way to specify a specific iteration row to be executed using Newman, but can be done using Powershell or by using Newman as a library.
The approaches are as below
Powershell:
here we read the actual csv file in the current directory using import csv
Then considers only row 1..2 , if you just want 1 row you can change $a[1..2] to $[1]
records = pm.variables.get("records")
index = pm.variables.get("index")
//we are setting variable
if (index !== records.length) {
for (let i of Object.entries(records[index])) {
        pm.variables.set(i[0], i[1])
    }
    pm.variables.set("index", ++index)
    pm.variables.get("index")===records.length?null:postman.setNextRequest(pm.info.requestName)
}
Now you can run data driven for that one particular request:
Note that here we used pm.variables. this is because it creates local variable that get destroyed after the collection run completes .
So for each run , first value will be null and then will be set to 0
authorization: apikey-header : key: X-Api-Key and value: yourapikey
test-script :
pm.environment.unset("requestToRun")
reqeustlist = pm.response.json().collection.item.map((a) => a.name)
requestToRun = reqeustlist.filter((a) => a.includes(pm.environment.get("tag")))
let val = requestToRun.pop()
pm.environment.set("requestToRun", requestToRun)
val ? postman.setNextRequest(val) : postman.setNextRequest(null)
Now set the envirnoment variable as what you want to look for eg: run script that contains text “Regression” then set pm.environment.set("tag","Regression")
Now in your collection-pre-request add:
if (pm.info.requestName !== "initial request") {
    let requestToRun = pm.environment.get("requestToRun")
    let val = requestToRun.pop()
    pm.environment.set("requestToRun", requestToRun)
    val ? postman.setNextRequest(val) : postman.setNextRequest(null)
}
In postman if we check the UI, we notice that there is no way to define file path as variable.
This looks like a limitation when we need to run file from different systems
Solution:
The solution is to hack the collection.json file. Open the json and edit the formdata src and replace it with a variable, let say fire_path so : {{fire_path}}
Till now , we have executed requests but have not written any testscripts. Meaning, there were no validation steps to verify whether the request passed or failed.
Now let us see who to do this. Let us write our first test script.!!!! 🙂
Automation tests with Postman:
There are two parts were we can write the scripts for our tests.
Pre-request script
Tests
Here pre-request script act as the test setup script, meaning, it will get executed before the tests. So if you have any pre-requisite like creating user variable or validating whether a user variable value exists, you can do it here.
Tests are were we write the actual tests, it get executed after we get the response.
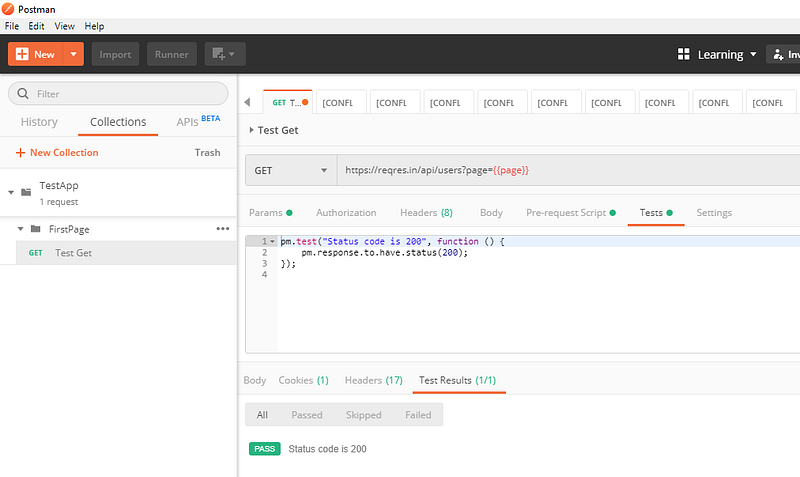
Writing first Test script:
The syntax of writing tests are as follows:
pm.test("Test_case_description", function () {
<Validation steps!> ( The steps are available as test snippet you just need to select it )
});
Note:
We can write tests at both the places ( Pre-request or Tests) but as tests are meant to be validating the user action, it should be written at the ‘Test’ tab so that it will be executed only after the action is completed.
Postman pm.test function expects different exceptions and passes or fails the test accordingly. You can try running just the below command without the ‘pm.test’ enclosed and observe that on sending the request an assertion is thrown.
(The below script is to validate whether the text ‘test’ as sub-string ‘b’ in it.)
pm.expect('test').to.have.string('b');
Now enclose the command in pm.test as below on both pre-request and Tests tab:
pm.test("Check string", function () {
pm.expect('test').to.have.string('b');
});
Now send the request and you will observe that two tests were executed.
Run the same using collection runner (Make sure to click save before running runner):
Chaining the response together:
Get the data from response body and store it in an environmental variable:
pm.test("Get email", function () {
var jsonData = pm.response.json();
var email= jsonData.data[2].email;
pm.environment.set("email", email);
});
Use this environmental variable in next test.
{
"email": "{{email}}",
"password": "cityslicka"
}
Till now , we have executed requests but have not written any testscripts. Meaning, there were no validation steps to verify whether the request passed or failed.
Now let us see who to do this. Let us write our first test script.!!!! 🙂
Automation tests with Postman:
There are two parts were we can write the scripts for our tests.
Pre-request script
Tests
Here pre-request script act as the test setup script, meaning, it will get executed before the tests. So if you have any pre-requisite like creating user variable or validating whether a user variable value exists, you can do it here.
Tests are were we write the actual tests, it get executed after we get the response.
Writing first Test script:
The syntax of writing tests are as follows:
pm.test("Test_case_description", function () {
<Validation steps!> ( The steps are available as test snippet you just need to select it )
});
Note:
We can write tests at both the places ( Pre-request or Tests) but as tests are meant to be validating the user action, it should be written at the ‘Test’ tab so that it will be executed only after the action is completed.
Postman pm.test function expects different exceptions and passes or fails the test accordingly. You can try running just the below command without the ‘pm.test’ enclosed and observe that on sending the request an assertion is thrown.
(The below script is to validate whether the text ‘test’ as sub-string ‘b’ in it.)
pm.expect('test').to.have.string('b');
Now enclose the command in pm.test as below on both pre-request and Tests tab:
pm.test("Check string", function () {
pm.expect('test').to.have.string('b');
});
Now send the request and you will observe that two tests were executed.
Run the same using collection runner (Make sure to click save before running runner):
Chaining the response together:
Get the data from response body and store it in an environmental variable:
Work space allows you to organize your work. It creates a separate working space where you group all your works including tests,collections, environments etc ( will learn as you read on).
Click My work space and select create New workspace
Note: Workspace could be personal, private or Team. Personal will be available only to you, shared will be available to everyone else with the invitation link and private is enterprise version and allows team members who were invited by you to be part of the workspace.
Team workspace and My Workspace are default workspace and cannot be deleted. To delete other workspaces, goto All workspace (will be opening in browser) and select delete by click ing the meatball menu.
Create Collection:
Collection allows to group your requests together in a logical order. It could be seen as the test suite level and we will have individual requests as the tests.
You also create folder inside postman to group your tests more efficiently for example :
Collection name be “Android FaceAPP”
And Folder name be “Test_LoginFeature”
Click collections>New collections for creating new collection
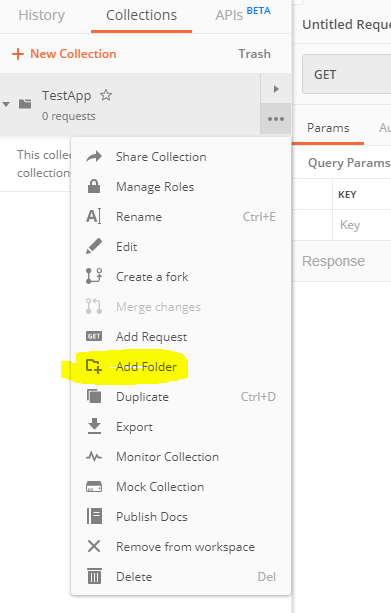
Click meatball menu> Add folder, to create folder
Create your first request:
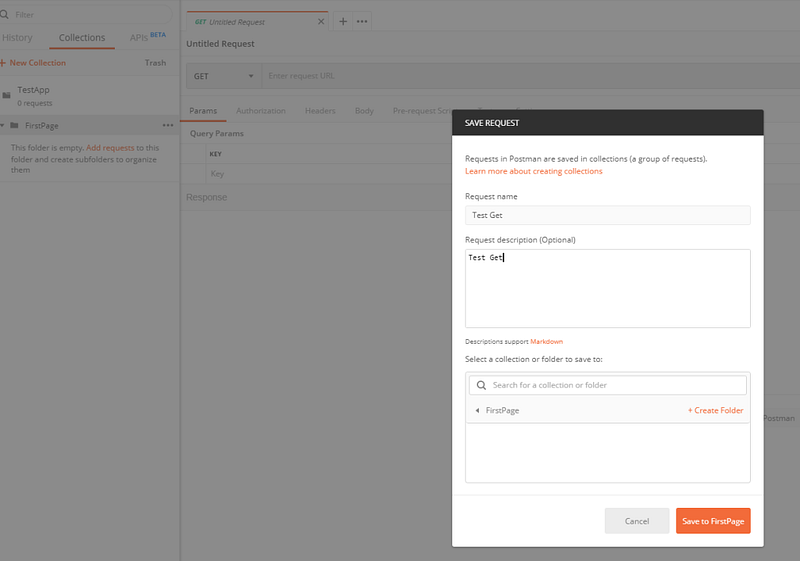
Create a new request by clicking New or by using meatball menu corresponding to the desired collection and folder.
Add the request details:
And click save ( don’t forget to click save else the request won’t be saved onto collection- folder hierarchy)